How to Install The V-BAT™ Pipe Clamp to a Unistrut Using a Spring Nut and Bolt

Installing equipment and accessories to a unistrut framework can seem daunting if you're unfamiliar with the process. This guide will walk you through installing Our V-BAT™ Pipe Clamp to a unistrut using a spring nut bolt. Our V-BAT™ Pipe Clamp, available at Uniclamp USA, is a versatile and robust tool designed to enhance the functionality of any installation.
Tools and Materials Needed
Firstly, gather the required tools and materials. Having everything readily available will make the installation process quicker and more efficient.
Tools:
- Socket Set: Required to tighten the bolts.
- Measuring Tape: To ensure accurate placement.
- Marker or Pencil: For marking the positions where Our V-BAT™ Pipe Clamp has to be attached on the Unistrut.
- Level: To ensure proper alignment of the Unistrut.
Materials:
- V-BAT™ Pipe Clamp: The main accessory to be installed.
- Unistrut Channel: The structural component to which the V-BAT™ will be attached.
- Spring Nut: Specially designed for easy insertion and positioning in the unistrut.
- Bolt: To secure The V-BAT™ Pipe Clamp to the spring nut.
Understanding the Components
It is essential to understand the components involved:
Unistrut Channel:
Unistrut channels are widely used in construction for supporting loads and structures. They come in various shapes and sizes, offering flexibility for different applications.
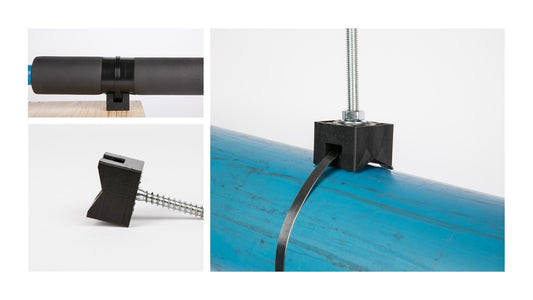
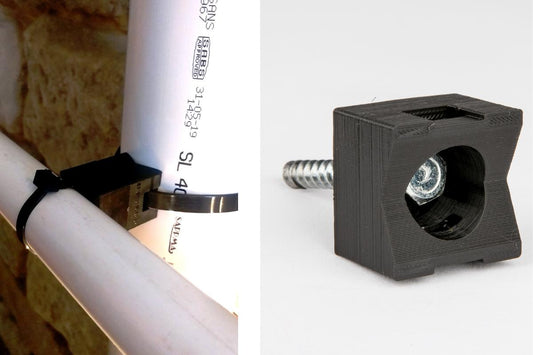
Our V-BAT™ Pipe Clamp:

Our V-BAT™ Pipe Clamp is designed to be attached to walls, ceilings, beams, and a unistrut channel(when used with a spring nut), providing additional support and functionality.
Spring Nut:
Spring nuts are unique fasteners designed to slide into the unistrut channel and lock into place, offering a secure and adjustable conjunction point.
Bolts:
Bolts are used to fasten Our V-BAT™ Pipe Clamp to the spring nut. Always ensure you have the correct size and type as specified by the manufacturer. Our V-BAT™ Pipe Clamp has a threaded rod/bolt hole size of 5/16" but can be expanded to 3/8".
Step-by-Step Installation Guide

Step 1: Preparation
Ensure the working area is clean and free of obstructions. Collect all tools and materials, and double-check that you have everything required for the installation.
Step 2: Positioning the Unistrut Channel
Decide on the exact location where you want to install The V-BAT™ Pipe Clamp on the unistrut. Use a measuring tape to find the correct position, and mark it with a pencil or marker. Ensure that the unistrut channel is level to provide a stable installation.
Step 3: Inserting the Spring Nut
Insert the spring nut into the unistrut channel. The spring nut has a spring mechanism allowing easy positioning within the channel. Slide the spring nut to the marked position.
Step 4: Aligning The V-BAT™ Pipe Clamp
Position Our V-BAT™ Pipe Clamp over the spring nut. Align the holes on The V-BAT™ with the spring nut.
To provide a secure installation, accurate alignment of The V-BAT™ Pipe Clamp is crucial.
Step 5: Inserting the Bolt
Insert the bolt through The V-BAT™ Pipe Clamp and into the spring nut. Start threading the bolt by hand to ensure it catches precisely.
Once the bolt is threaded, use a socket to tighten it securely. Be careful not to overtighten, as this could strip the bolt and nut thread.
Step 6: Final Adjustments
Once The V-BAT™ Pipe Clamp is securely attached, check its alignment and make necessary adjustments. Ensure that Our V-BAT™ Pipe Clamp is securely fastened.
Step 7: Inspection and Testing
After installation, inspect Our V-BAT™ Pipe Clamp and the unistrut channel to ensure everything is correctly installed and solid. Test the stability of The V-BAT™ Pipe Clamp by applying a small amount of force to ensure it does not move.
Tips for a Successful Installation
- Double-Check Measurements: Accurate measurements are critical for a successful installation. Always double-check your measurements after marking.
- Use the appropriate Tools: Using the required tools for the job will make the process smoother and prevent damage to the components.
- Follow Manufacturer Guidelines: Refer to the manufacturer’s instructions for specific details.
- Safety First: Wear appropriate safety gear, such as gloves and safety glasses, to protect yourself during installation.
Common Issues and Troubleshooting
Spring Nut Slippage
If the spring nut slips within the unistrut channel, ensure it is properly inserted and aligned. Re-adjusting the position or using a different spring nut will solve this issue.
Misalignment
If the V-BAT™ is not aligning correctly with the spring nut, double-check the positioning of both components. Adjust as necessary to achieve proper alignment.
Bolt Not Tightening
Ensure the correct size and type, if the bolt does not tighten properly. Using the incorrect bolt can lead to a loose connection.
Features and Benefits of Our V-BAT™ Pipe Clamp?

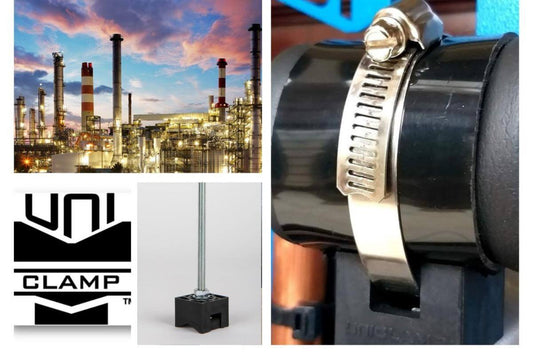
Material: Made from 30% glass-reinforced nylon 6, providing excellent durability and strength. Our manufacturers recommend limiting the weight limit 1100 lbs (499 kg), but Our Laboratory Results show that Our V-Bat™ Pipe Clamp when used with a hose clamp can handle over 1500 lbs.
Size Range: Accommodates pipe sizes from 3/8" to 5"(9mm up to 127mm).
Temperature Resistance: Our V-Bat™ Pipe Clamp can withstand temperatures up to 572°F (260 degrees Celsius) proving its versatility and ability to be used in high-temperature applications.
Chemical Resistance: Resistant to acids and 95% of common chemicals, ensuring longevity in extreme environments.
UV Resistance: With added UV stabilizers Our V-BAT™ Pipe Clamp has a 15-20 year Solar/Outdoor Lifespan.
Certifications: Our V-BAT™ Pipe Clamp has been Certified by UL2239, UL2043, ISO, RoHS, Reach, and Branz.
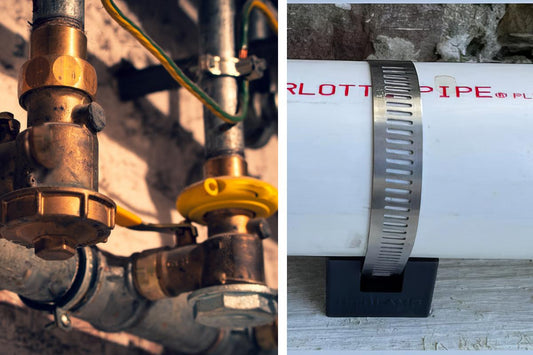
Versatility: The triad-purpose design accommodates various applications, reducing the need for different types of clamps. Our V-BAT™ Pipe Clamp can be used as a Hanger Clamp, Spacer, or Flat Surface Clamp. Check out The V-BAT™ Pipe Clamp A 3-in-1 Product for more information.
Economical: Priced at $2.20 per unit when purchased in bulk, Our V-BAT™ Pipe Clamp offers significant savings. With a 15-20 year lifespan, Our V-BAT™ Pipe Clamp saves your business maintenance and labor costs.
Ease of Installation: Compatible with Hilti guns for quick and efficient installation, demonstrating Our V-BAT™ Pipe Clamp's robustness, showing no signs of stress, cracks, shattering, or weakening, highlighting its suitability for heavy-duty use.
Environmental Resistance: Rust-proof, waterproof, and resistant to acid, making it ideal for both indoor and outdoor applications.
If Uniclamp does not make a difference in your business, simply reach out to us, we shall pay the return shipping, and we'll refund you 105% of your purchase, providing peace of mind and confidence in its reliability.
Applications
Our V-Bat™ Pipe Clamp is suitable for:
HVAC Systems: Securing condensate piping and refrigerant lines.
Electrical Installations: Managing cables and data cabling efficiently.
Plumbing and Gas Systems: Suitable for various pipe installations, including water and gas lines.
Solar Industry: Effective for use in Solar and conduit installations.
Industrial Environments: Reliable in any industry including Oil and Telecommunication.
Conclusion
Installing Our V-BAT™ Pipe Clamp to a unistrut using a spring nut and bolt is straightforward. By following this step-by-step guide, you ensure a secure and effective installation, enhancing the functionality and reliability of your unistrut system. Remember to take your time, double-check your work, and prioritize safety throughout the installation process.