Removing Pipe Clamps from Unistrut: A Step-by-Step Guide

Pipe clamps are essential for various industries, they secure and support pipes in different installations, providing reliability and stability, which makes them indispensable in residential and commercial projects.
However, there are times when these clamps need to be removed for maintenance, repairs, system modifications, relocations, or inspections.
This guide will walk you through the step-by-step process of removing pipe clamps from Unistrut, ensuring a safe and efficient procedure.
Situations Requiring Removal of Pipe Clamps

Maintenance and Cleaning
Routine maintenance often necessitates the removal of clamps to inspect the pipes for wear, corrosion, or damage. Additionally, cleaning the area around the pipes might require removing the clamps to gain better access.
Repairs and Replacements
- Damaged Pipes: If a pipe is leaking, corroded, cracked, rusted, or showing signs of deterioration, the clamps need to be removed to replace the pipe. Inspect the removed clamps and replace them if necessary.
- Clamps Replacement: Replace clamps if they are rusted, damaged, or lack adequate support.
System Modifications
- Upgrading Systems: Upgrading or modifying the piping system may require replacing clamps to accommodate new pipe routes or additional pipes.
- Rerouting Pipes: Changes in the building layout or plumbing system might necessitate rerouting pipes, which involves removing existing clamps and installing new ones if required.
Relocation
- Moving Equipment: When relocating equipment or machinery that relies on the piping system, the associated pipes and clamps need to be moved.
- Structural Changes: Renovations or structural changes to the building require removing and repositioning pipe clamps.
Inspection and Compliance
- Safety Inspections: Compliance with safety regulations and codes might require the temporary removal of clamps to ensure standards are upheld.
- Fire Safety: Clamps might need to be removed to inspect fire suppression systems if mandated.
Signs Indicating the Need for Removal
- Visible Wear and Tear: Cracks, rust, or other signs of deterioration on clamps or pipes.
- Unusual Noises: Creaking, clanking, or other unusual noises from the pipe system.
- Leaks: Water or other fluids leaking from around the clamp area.
- Loose Clamps: Clamps that appear loose or are not holding the pipe securely.
- Vibration: Excessive vibration in the pipes indicates that the clamps are not properly securing the pipes.
Safety Precautions
- Shut Off Systems: Ensure that any systems using the pipes (e.g., water, gas) are shut off before removing clamps.
- Support the Pipes: Use temporary supports to keep pipes in place while clamps are being removed.
- Use Proper Tools: Ensure you have the correct tools to remove and replace clamps safely.
- Protective Gear: Wear appropriate protective gear, including gloves and safety glasses.
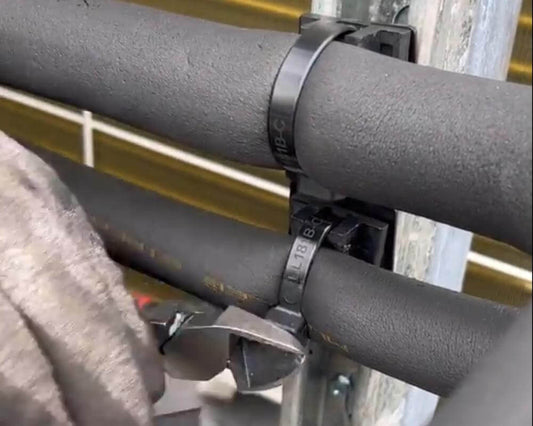
Removing Nylon or Stainless Steel Zip Ties from a Pipe

Tools Required
- Cutting Pliers: For cutting the zip tie.
- Screwdriver or Needle-Nose Pliers: For prying the tie if necessary.
- Heavy-Duty Cutting Pliers or Wire Cutters: For cutting the tie.
- Small Hacksaw: For cutting the tie if needed (Stainless Steel Zip ties only)
Steps to Remove Nylon or Stainless Steel Zip Ties
- Identify the Locking Mechanism: Stainless steel ties usually have a self-locking mechanism. Identify where the locking tab is located.
- Position the Cutting Tool: Place the cutting pliers or wire cutters close to the locking mechanism. Cut through the tie as close to the lock as possible to minimize the tie left around the pipe. When Cutting the Nylon Zip Tie, simply just cut it and remove it.
- For Thick Ties: Use heavy-duty pliers or a small hacksaw if necessary.
- Remove the Cut Pieces: After cutting, remove the pieces of the tie from around the pipe. If the tie does not come off easily, use a screwdriver or needle-nose pliers to pry it away carefully.
- Clean Up: Ensure that all pieces of the zip tie are removed from the working area. Dispose of the cut tie pieces properly to avoid any injury from sharp edges.
Tips
- Work Slowly: Take your time to avoid damaging the pipe or injuring yourself.
- Use Proper Tools: Ensure the tools you are using are suitable for cutting Nylon or stainless steel.
- Inspect the Pipe: After removing the tie, inspect the pipe for any damage that might have been caused by the tie or during the removal process.
Removing Unistrut Pipe Clamps
Types of Unistrut Clamps
The following are prominent examples of Unistrut clamps:
- Unistrut Pipe Clamp
- Unistrut Spring Nuts
- “K” Pipe Clamp
- CH 4850 Pipe Clamp
- ⅜” Rigid Pipe Clamp
- SS2H Pipe Clamp
- M1124 Pipe Clamp
- Two-Piece Unistrut Pipe Clamp
Tools Required
- Wrench or Socket Set: To loosen the bolts or nuts.
- Screwdriver: If the clamps are secured with screws.
- Safety Gloves: To protect your hands.
- Safety Glasses: To protect your eyes from debris.
Steps to Remove Unistrut Pipe Clamps
- Identify the Type of Clamp: Determine whether the clamp is secured with bolts, nuts, or screws. Check the size and type of fasteners used (e.g., hex bolts, carriage bolts, etc.).
- Prepare Your Work Area: Ensure you have enough space to work comfortably. Wear safety gloves and glasses to protect yourself.
- Loosen the Fasteners: Use the appropriate wrench or socket to loosen the bolts or nuts by turning them counterclockwise. If screws are used, select the correct screwdriver and turn counterclockwise to loosen them.
- Support the Pipe: If the pipe is heavy or under tension, support it securely before fully removing the clamps to prevent it from falling or shifting unexpectedly.
- Remove the Clamps: Once the fasteners are loose, remove them completely. Carefully take off the clamp from the Unistrut and the pipe.
- Inspect the Components: Check the condition of the Unistrut and pipe for any damage or wear. Clean the area if necessary.
Tips
- Work Methodically: Loosen the fasteners evenly to avoid putting undue stress on any part of the clamp, Unistrut, or pipes.
- Use Proper Tools: Ensure you have the correct size wrench, socket, or screwdriver to avoid stripping the fasteners.
- Keep Track of Hardware: Collect all bolts, nuts, and screws in a safe place to avoid losing them.
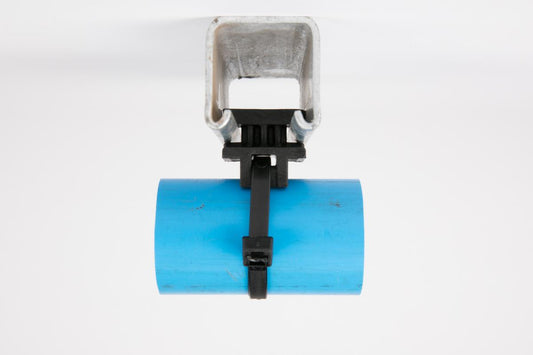
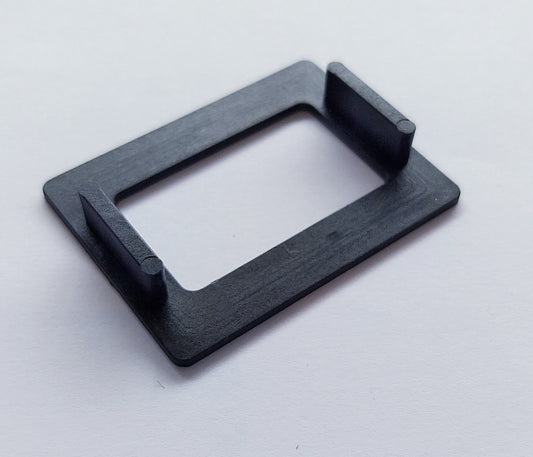
Why You Need The Uniclamp To Simplify The Installation and Removal Process

UNICLAMP Strut pipe clamp installations take only 10 seconds, 83% faster than competitor clamps. Simply place, twist, and strap; to remove cut away the fastener, twist, and remove, done in less than a minute.
How to Remove the UNICLAMP Strut Pipe Clamp
- Remove the Tie: If a zip tie or hose clamp needs to be removed, cut it using the appropriate tool such as a side cutter.
- Twist and Remove: Twist the Uniclamp Strut pipe clamp clockwise and remove it.
- Quick and Easy: The process is designed to be quick and easy, ensuring minimal downtime.
UNICLAMP Unistrut Pipe Clamp offers versatility, durability, and cost-effectiveness. Investing in high-quality pipe clamps from Uniclamp USA enhances the safety and performance of your installations while offering significant savings in terms of time and cost. For more information and to purchase these innovative clamping solutions, visit Uniclamp USA.
By following these steps and guidelines, you can safely and effectively remove pipe clamps from Unistrut, ensuring your systems remain efficient and secure.
Featured Image Source Joey from HVAC KOMBAT